VS – V-smart
1 Introduction
This manual describes some general characteristics of V-smart. Subjects covered include:
· logging in and out
· the main screen
· standard options within V-smart
· navigation
· options on result screens, like sorting
· generating output
· starting processes
2 Logging in and out
You will need a login and password to access V-smart. Your system administrator will assign you a login and password.
· There are two ways to start using V-smart.
- Click on the V-smart Desktop Icon which may look similar to this:

or:
- Start your browser and select the V-smart application from your favourites.
The system will start the V-smart application.
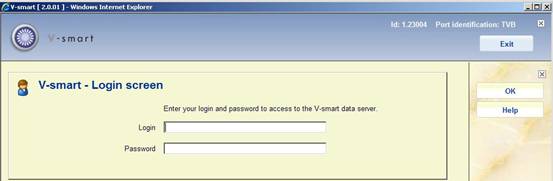
You will see the Login screen:

· Enter your login and password
· Click or press Enter
You will now see the main V-smart menu screen:
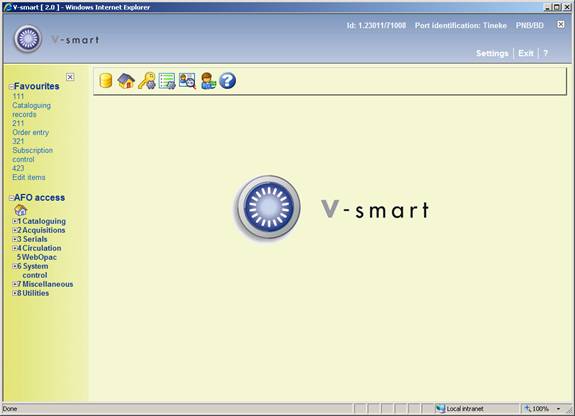
See section 3 for an explanation of this screen.
Note
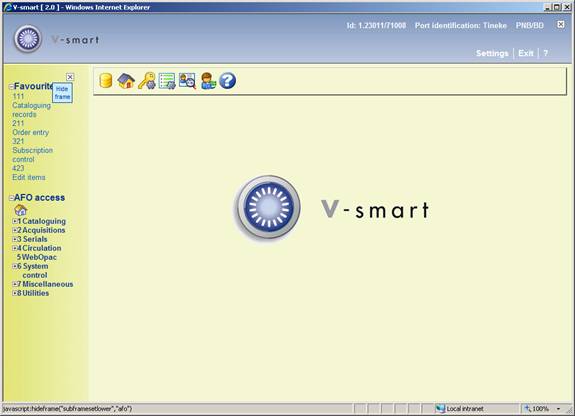
If you have a specific port ID (see section 10 – Preferences) you will see this information in the top bar of the screen when you log in. After log-in is completed, this information will disappear again:
2.1 Log out
To close V-smart and end your session you can do one of the following:
· Click the icon at the right top of the screen. In this case the system will prompt for confirmation:

or
· Press Alt+F4.
or
· Close your browser window.
Please note
Firefox browsers will utilise 2 separate windows. When exiting or closing the application, the second browser window will also have to be closed via the Alt+F4 or X button on the browser window itself.
Infor recommends you return to the main menu before closing your browser. If you disconnect while still within a record (borrower details, item details, order, subscription, bibliographic record, loans, returns) this may result in problems later.
If a popup window appears, one can close this window via X. Sometimes the session is then frozen. Therefor Infor recommends you always use the OK or Cancel buttons on these popups.
2.2 Log in with a different user ID
Once you are using the system, you can also log in as a different user, without explicitly having to log out first. For this you use the icon ‘' on the V-smart start screen.
![]()
The form for entering Login and Password is shown again. This implicitly logs out the current user. See also the Help for AFO 623 for additional information on this option.
When using this option, the system will return the new user to the screen from which you chose to log in with a different ID.
2.3 Electronic ID
When your library has eID (Electronic Identification) enabled it is also possible for staff to log in by scanning their eID card. See the separate documentation on eID (in the General section) for more information.
The Electronic Identity card usage is a feature originally developed for the Belgian market. It has system and license implications.
2.4 22.9. Opening additional V-smart sessions
It is NOT recommended to run multiple V-smart client sessions using the various browsers' “New TAB” functions as requests can become “confused”. The “New Window” option is OK to use. Multiple instances in different tabs of the same browser session is not recommended unless the browser start-up has been modified to remove the merged session handling.
Firefox users, do not start / close multiple sessions for V-smart OR multiple TABs with V-smart sessions. Once you have logged off one Tab, all others will be automatically closed. At the time of publication, no workaround for Firefox browsers had been identified.
IE7 users may try adding the attribute –nomerge to the IE7 command line to suppress the merged session handling.
For example, "C:\Program Files\Internet Explorer\iexplore.exe" -nomerge
For IE8 users, ‘-noframemerging ‘ can be added to the command line as an attribute for iexplorer.exe to allow for single session handling again. For example, "C:\Program Files\Internet Explorer\iexplore.exe" -noframemerging
3 The start screen
Once the login procedure is completed, the V-smart start screen will be shown:
This screen (like most of the other screens within V-smart) has a number of standard elements:
Status line
The status line is displayed at top right of the screen. This part can optionally be suppressed by clicking the ![]() icon. It can be reinstated using the
icon. It can be reinstated using the ![]() icon.
icon.
The fields are as follows, from left to right:
· session ID of the connection to the server
· the name of the user currently logged in
· the institution/location the work station is logged on to
· the AFO number
· on hovering the mouse over the user name, the database you are currently logged in to will be displayed, as well as the release number of V-smart between []

· When you use the Stack request module, on hovering the mouse over the location, the current stack location will be displayed
When you use Mobile library functionality, the current route/stop will be displayed next to the Institution/location:
![]()
Other options in this section:
· Settings: this is explained in section 10.
· Exit: this is explained in section 2.1
· Bookmark: Clicking this will result in a standard dialog window for adding the url to your Favourites:

· ?: clicking on the question mark results in a pop-up screen with version information:

Tool bar
The V-smart toolbar forms part of the main working area of V-smart. It provides various options in the form of icons. The display of icons will change according to the module you are using, and your previous actions. Unavailable options are greyed out.

Navigation column
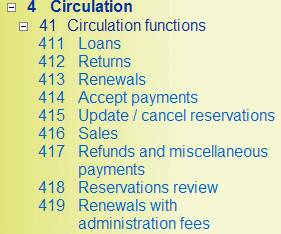
Functionality within V-smart is via an AFO (Activity, Function, Option) number. This is derived from the following:
· Within each menu or Activity are listed Functions such as the Item management function in the Circulation activity.
· Within the Functions there are Options.
· For example, items are lent to a borrower in AFO 411 Loans while items on loan are renewed in AFO 413 Renewals.
You can unfold and collapse the navigation through the system in the standard Windows manner. See section 5 for more information.
You will only see those AFO's to which you have access in this navigation frame.
Above the standard navigation, Favourites for the current login may be displayed. If no shortcuts have been defined, you will not see a heading Favourites. See section 3.3 for defining your own shortcuts.
This part can optionally be suppressed by clicking the ![]() icon. It can be reinstated using the
icon. It can be reinstated using the ![]() icon.
icon.
Options on the main screen
: this option allows you to switch between databases. See section 3.1.
: this option allows you to switch between institutions and/or locations. See section 3.2.
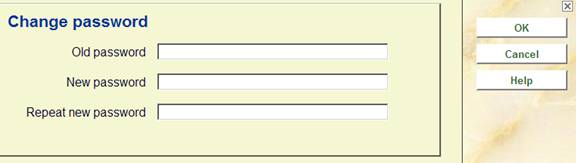
: this option allows you to modify your password. An input form is shown:
: this option allows you to create your own shortcuts on the start screen. See section 3.3.
: with this option you can view details of the current user. See section 3.4.
: use this option to log in as a different user. See section 2.2.
: use this option to log out and close V-smart. See section 2.1.
3.1 Change database
It is possible more than one database has been configured on your system. If you have access to these databases, you can use this option to switch from one database to another.
After choosing the option you will be presented with an input form:

Enter the number of the required database and click . The title bar will now show the name of the selected database, when you hover the mouse over user name.
3.2 Change institution/location
It is possible more than one institution has been configured on your system. Besides this more than one location can be defined within each institution. If you have access to these institutions and/or locations, you can use this option to switch from institution/location combination to another.
After choosing the option you will be presented with an input form:

Enter the code of the required institution and/or location and click . When entering both institution and location, you must separate the codes with a slash, ‘/'. The system will show a message:

The status line at the top will now show the selected institution/location combination.
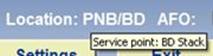
If you use the Stack request module, you may be additionally prompted to select a service point within the new location:

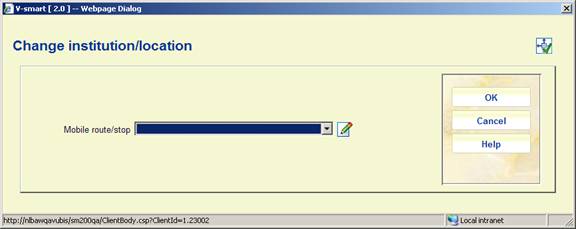
When you use Mobile library functionality, you may be additionally prompted to select a route/stop within the new location:
3.3 Parameters
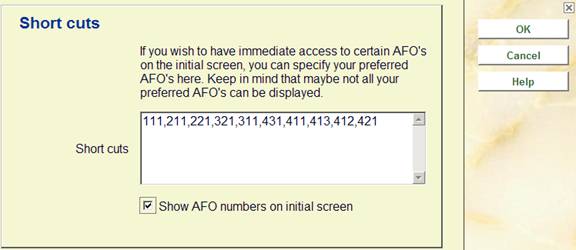
This option allows you to create your own shortcuts on the start screen. After choosing this option an input form will be displayed:
Fields on the screen
Short cuts: Enter the numbers of the AFO's you want to have shortcuts to, separated by commas.
Show AFO numbers on initial screen: this option is not relevant for V-smart, where AFO numbers will always be shown on the menu.
3.4 Process info
: with this option you can view details of the current user. After choosing this option an information screen will be displayed:

Fields on the screen
Date: current date (from server).
Time: current time (from server).
Name: name of user currently logged in (as defined in AFO 611).
Institution/location: codes of the institution/location combination that the user is currently logged in to.
Database: number of the database the user is currently working in.
Port (phys.): This is the TCP port of the server daemon, followed by the job number.
Port (log.): This is the port identification as used in AFO 612.
Process: the number of the Caché process for this user.
Cash desk: the cash desk defined for the current institution/location and workstation.
Depending on other, optional, functionality that may be in use, more information can appear on this form:
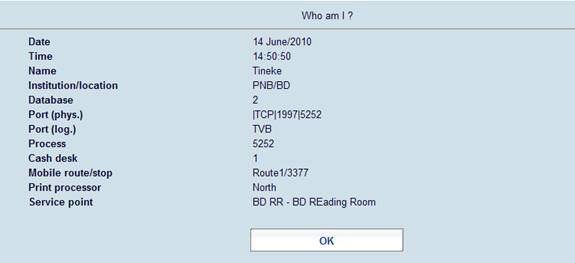
Mobile route/stop: the current route and stop for mobile libraries.
Print processor: the current print processor for generating mailmerge documents.
Service point: the current service point for stack requests.
4 Standard options within V-smart
Most commands within V-smart can be given via icons. As mentioned previously, valid icons are shown in the tool bar at the top of the screen.
It is possible to get more information on the actions of an icon. This tool tip is shown when you put the mouse cursor over an icon.
If the tool tip contains the string "(+)" this means you must first select an item from the list on screen before clicking on the icon. You select a line by checking the box left of a line:
![]()
![]()
A number of icons can be found on almost any V-smart screen:
|
Icon |
Definition |
Effect |
|
|
Back |
Go back to the previous page |
|
|
Help |
Displays the Help files |
Other common icons are:
|
Icon |
Definition |
Effect |
|
|
New |
Use to enter a new item. Depending on the AFO where you are this can be, title, item, borrower, order, etc. |
|
|
Select |
Use to select an item from a list. Displays details of the item selected or performs action on item selected |
|
|
Select all |
This icon is offered when the system shows a list with various items (titles, copies, codes, etc.). Or when a part has an input form with multiple fields. By using this icon, you select all items in the list/fields on the input form at once. |
|
|
Delete |
Use to delete the selected item. Depending on the AFO where you are this can be, title, item, borrower, order, etc. |
|
|
Delete all |
This icon is offered when the system shows a list with various items (titles, copies, codes, etc.). By using this icon you delete all items from the list shown at once. |
|
|
Cancel |
Use this icon to specify you do not wish to use any of the available options. Or use to cancel the last action you performed. |
|
|
|
Prints depending on the context. e.g. in Loans prints a loan slip. See also section 8. |
|
|
Next |
Displays the next page when you have a long list. |
|
|
Previous |
Displays the previous page (only available after using the ‘next page' option). |
The following keys have a special meaning within V-smart:
|
Key |
Meaning |
|
<ENTER> |
OK, or confirmation |
|
F9 |
Cancel, or Go back |
|
F8 |
To pull up a list for any input field marked with (*) |
|
F12 |
Shortcut to all options |
|
Ctrl+F12 |
Help |
4.1 Save settings
Many dialog screens have an option at the bottom Save settings. This means information on the form will be saved as default data for the next time you use this form.
![]()
This setting is retained on a per user / per form base. I.e. it is OFF initially, but once you set it, it will remain ON until you clear it.
Note
On the filter forms where you can clear the filter, you have to remember that you have to clear all the settings on the forms as well otherwise the clearing of the values is not remembered.
5 Navigation
Although V-smart can be controlled completely with the mouse, it is possible in almost all cases to use the keyboard instead.
Any option (icon) can be activated by double clicking. Any line can be selected by clicking or by checking the box to the left of the line. Each button can be activated by clicking it once.
You can navigate through V-smart by clicking on each menu and submenu to get to a function:

You can also key in the AFO number and press <enter>.
Note
Anything you type in on a menu screen will be shown at the top, left aligned underneath the main toolbar.

Within the Circulation module you can switch from one AFO to another by keying in the AFO number at any prompt (except the bibliographic search forms such as in AFO's 421 and 422).
There is a special "home" icon in the left hand navigation column that allows you to go to the initial screen from wherever you are in the application:

5.1 Navigation within an AFO
In the tool tip you can always see which keystroke(s) will perform the same action. If this key (combination) is followed by a *, you must also enter the line number.
On any screen you can always pull up a list displaying all options valid for that particular screen. Activate this with F12, close by:
· - select option with mouse
· - press F9
· - click with mouse on area without text

In this example you can:
· add a new item by selecting the icon ‘' OR by typing the letter “I” followed by <enter>
· receive an item by clicking a line OR by selecting a line and choosing the icon ‘' OR by typing the line number followed by <enter>
· delete an item by selecting a line and choosing the icon ‘' OR by typing the letter “S” followed by the line number and then <enter>
· etc.
You can always select a line on an overview screen by checking the box left of the line number followed by <enter> OR by clicking the relevant line once.
Note
Anything you type in on an overview screen will be shown at the at the top, left aligned underneath the main toolbar.

5.1.1 AFO with menus
In any AFO that shows a menu first, you can either click on the menu option to select it or key in the line number (although no line numbers are displayed on screen). Example:
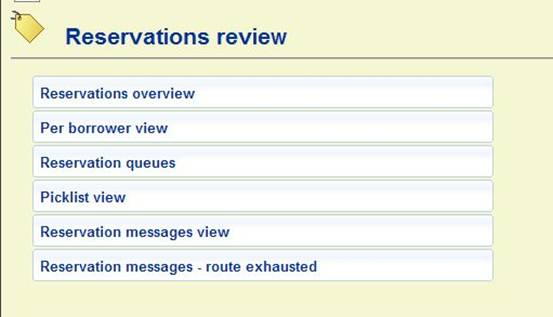
Keying 4 <enter> on this screen will take you straight to the Picklist view.
See section 10.2 for information on displaying line numbers for menu entries.
5.2 Windows key combinations
It is also possible to use a number of standard Windows key combinations and options within V-smart.
Input forms contain buttons that can be selected with the mouse. Instead you can also perform the same action by typing in the underscored letter while holding down the SHIFT and CTRL-keys simultaneously.
In the example above you can:
· click the button OR use CTRL+SHIFT+N
· click the button OR use CTRL+SHIFT+A
· click the button OR use CTRL+SHIFT+P
The following standard Windows keys (combinations) are also valid:
|
Key (combination) |
Purpose |
|
space bar |
Select a check box. |
|
UP and DOWN arrow keys |
Go up or down in dropdown list. |
|
<TAB> |
Go to the next field. |
|
<SHIFT><TAB> |
Go to the previous field. |
Notes
F11 is the standard key to display a browser full screen or switch to display of address bar. V-smart normally starts up as full screen. However, depending on where the cursor is and the type of screen you are on, F11 may cause the address bar to be displayed.
You can use CTRL-P to print the current frame (i.e. the frame in which the cursor is positioned).
5.2.1 Editor functions
When you are editing fields in records you can use combinations of keys, or mouse clicks to perform certain actions.
|
Key |
Action |
|
Shift + Home |
Selects from the end of a field all the text within that field |
|
Shift + End |
Selects from the beginning of a field all the text within that field |
|
Tab |
Go to the next field |
|
Shift + Tab |
Go to the previous field |
|
Left mouse key on an icon |
Execute the action for that icon |
|
Double-click Left mouse key |
Select the word |
|
CTRL, click |
To select/deselect items from list fields (lists where you move items from left to right or vice cersa) |
|
SHFT+CTRL, click |
To select/deselect a range items from list fields (lists where you move items from left to right or vice cersa) |
If you want to copy/paste between a non-Vsmart application and the record editor, you can use the standard Ctrl-C and Ctrl-V keys.
5.3 Navigation within forms
5.3.1 Lists

The above icons indicate entry as list box ![]() .
.
Click on this type of icon to activate a LISTBOX function.
Some List boxes are defined to allow single entry (in which case a down arrow will appear) or multiple entries/selections (in which case no down arrow appears, but a list of valid entries instead).
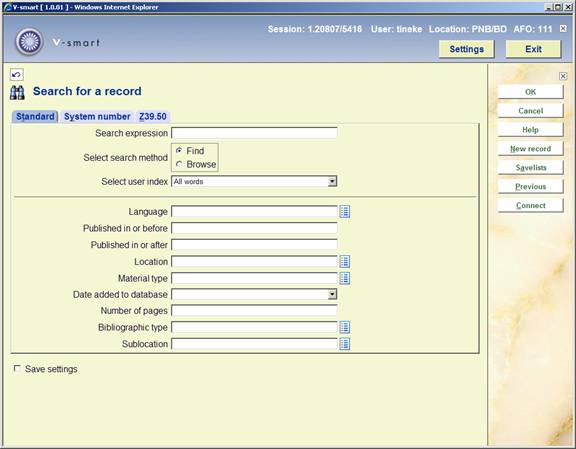
Our first case here is the multiple entry selection for LANGUAGE field. Data entry into the provided text box will not be accepted as it must be entered from the list box.
When you click on the list ICON, it will turn into a drop down list and a checkmark:

Click on the selection. Multiple selections are done by pressing the CTRL key while clicking on the entry. Once done, click on the checkmark beside the field to enter the values into the field and close off the list box.
You can deselect an entry with CTRL + left mouse click.
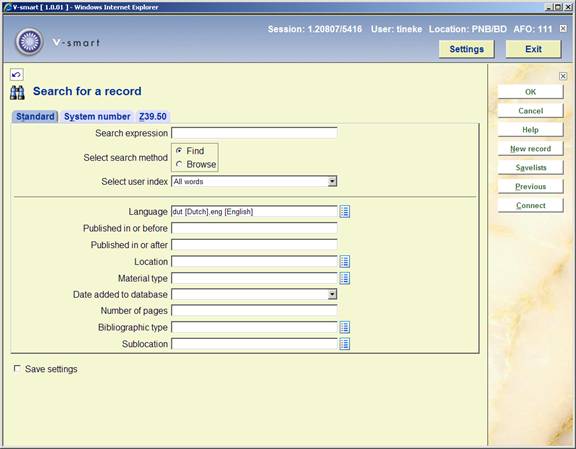
List boxes which have the down arrow mean that you can select a single entry from the list. Click on the icon to get the values and select one by clicking on the entry. The list is closed and the data is entered into the field:


5.3.2 Other
The boxes which allow data elements to moved between active/ inactive per group are indicated by 2 sets of boxes and various arrows. Highlight and click the appropriate ![]() arrow to move between active/inactive or selected /not selected. In the selected elements section the up and down arrows (
arrow to move between active/inactive or selected /not selected. In the selected elements section the up and down arrows (![]() ) will be used to order the selected fields. You can use the
) will be used to order the selected fields. You can use the ![]() icons to expand of collapse a field that contains more data (so you don't need to use the scroll bars).
icons to expand of collapse a field that contains more data (so you don't need to use the scroll bars).
Fields which have been marked as Combo/Lists (i.e. you can select the data from an authority list or make up your own) will have a toggle. In this example, the list box is active therefore you can select an entry from the authority list (down arrow is available to activate the drop down list / single selection).
When you click on the pencil, this turns into a text box for data and the icon resets to activate back to list box.

Fields where you can input a numeric value or range have an I icon against them. On mouse over they will show valid entry/range:

Calendar fields will have a calendar icon against them, which will open up a calendar:
Use the < or > to view different months. Use X to close the calendar without modifications or click on a date in the calendar to select the value.

When an input form has the option to look for files the initial screen will look like this:

You can enter free text here, but must ensure path and file names are correct. Alternatively you can click on the icon next to the field. The form will reapper with a different first field:
![]()
You can use the button to browse for files on your local workstation or network. Clicking on the pencil icon will revert to the original free text field.
Note
You can use the Browse button to select a file (e.g. in AFO 131, AFO 367 – Miscellaneous, AFO 618 – Notice sets etc.). After retrieval the input field will show full path and file name.If you switch to the Pencil icon, the system only shows the file name and not the full path of the selected file. The Browse button will then go to the last file instead. Unable to see full path and file entered via V-smart.
This is an issue with Firefox only. Firefox does not pass the full path for security reasons.
If you need the full path, for instance because you want to save it for the next time, you will have to enter it yourself in the textbox (via the Pencil icon).
6 Options on result screens
On many result screens you have extra options, such as sorting, and changing the size of dialog boxes.
It is also possible to influence the number of columns shown on certain screens, as well as the order in which they appear.
6.1 Sorting
Many overview screens (like lists of titles, items, borrowers, orders, serials issues) contain information in columns. You can sort the information displayed differently by clicking on a column header.
Note
Sorting by clicking on a column heading is not possible on screens where sorting is offered as a separate option.
When sorting a result list, the system generated line number remains the same (i.e. line 1 can end up somewhere else in the display).
Before sorting:

After sorting by title:

6.2 Resizing dialog boxes
Dialog boxes appear in many places within V-smart. This can be for entering a search command, entering data, showing messages. These dialog boxes have a standard size, but can be resized. You do this by placing the cursor on the edge or corner of a box. The cursor will change to a double arrow. You can now drag the box to be smaller or bigger.

Each of these forms has an icon at the top right hand side:
![]()
or

When the resize icon has a green check, it means the window size information is saved when you close the form.
When you click on the resize icon, it will change.
When the resize icon has a red cross, it means the window size information is NOT saved when you close the form.
Notes
Not all resizing will be retained by the system. An attempt will always be made to get as much information as possible displayed vertically with small margins at top and bottom.
So even if you have set the green icon to retain resize information, the system may sometimes still display the original size of a form.
Repositioning of a form is not retained. Forms will always be centred.
You can not make a form smaller than the minimum width specified in the Preferences. See section 10.
For Firefox browsers the following is required:

The Advanced button for Javascript - Option "Move or resize existing windows" ON will allow Vsmart to resize popups according to data.
6.3 Handling grids and columns
You can change the number of rows shown on a listing screen; and you can adjust the columns shown in such grids.
General parameters for this feature can be set in AFO 623. Additional parameters for users can be set in AFO 611 – Add/modify logins, additional parameters for ports can be set in AFO 612.
If the Change column option is allowed for a given user, then the “CP Change column” option is availbale under the listing 'Shortcut to all options' (or the command CP can be keyed).
Selection of this option leads to a display showing the column headings, for example:

Required columns will be on the right hand side – and the order of display may be changed by pushing the column name up and down the list.
The option “Save column sort sequence” resolves the following.
A grid can be sorted by clicking on the column heading. This sorting is not retained the next time this screen is accessed.
If you check this option the system will retain the last column heading clicked for sorting for the next time.
If the user is able to configure these columns for all users, then the “apply settings to all users” option is offered.
The button resets the column configuration to the system supplied values.
Notes
If a grid changes (for example, as the result of a standard change to the display after an upgrade), then the local settings may no longer make sense and are deleted. The library may have to reapply any changes to the display settings. (It is fairly uncommon for a display to change significantly in this way).
Both the change column and number of rows setting do NOT apply to all such grids. Some grids / lists are not amenable to this change.
On certain grids (such as for loans in AFO 411) the command can only be activated in the first cell of the grid.
Although not all grids may be sorted by column, the option “Save column sort sequence” always appears and is therefore redundant in some cases (i.e. then it makes no difference whether this option is selected or not).
AFO 411 and 412: when using the CP command here, you should not change the first column Item barcode, because all subsequent information in the grid is dependent on what the barcode is.
User settings will take precedence over general ‘apply to all users' settings if applicable.
7 Generating output
In many places within V-smart you can print information. In such cases the standard dialog box for generating output will be shown:

The number of options available is determined via parameters in AFO 621. Consult the Help for this AFO for more information.
Possible options are:
Screen: Select this option to be able to send output to the screen. Usually this will be done via Windows Notepad.
Browser: Select this option to be able to send output to your Internet browser.
Spreadsheet: Select this option to be able to send output to a spreadsheet program.
Word processor: Select this option to be able to send output to a word processing program.
Printer: Select this option to be able to send output to a printer. The system offers you the possibility of using any (network) printer available to your workstation. The printers available to your workstation are specified at the network level (by the system administrator).
File: Select this option to be able to send output to a file on a hard disk (or floppy drive). The system offers you the possibility of saving a file to any (network) disk to which your workstation has access. In other words, the access to specific hard disks is specified at the network level (by the system administrator).
Email: Select this option to send output to a mail program available to your workstation or on the network.
Printer spooler (‘raw' printing): Use this type of printing to print directly to the printer spooler. If you do this, the system will circumnavigate the standard Windows print queues and direct the output directly to the printer. This may be useful to print to older printers such as matrix printers.
Default input file: Select this option to specify the name of and path to a default input file.
Delimited output: the default delimiter is a comma. This cannot be changed interactively.
Please note
If the client side asks you for output type (word processor, screen etc) then the output will be sent back to your browser.
If the client asks you for input, it would be from the point of view of the client/ browser and then transferred over to the server for processing.
When you are requesting output from processes executed in ONLINE Mode, output is generally sent back to your workstation.
When you are running batch or memory mode (various jobs), output is directed to the server.
Example:
SSP reports executed in batch or memory mode will use the SSP Report directory for output storage.
If it is executed in online mode, then you are asked to save the output locally (browser window).
Fonts for output
If the Printer applet is not defined, the default output is produced in Courier-10pt. However, this may be adjusted by adding the class definition to the style sheet being used.
The style sheet definition for example could be set up in the css page as follows:
.printer { /*Printer settings without applet.. if not defined Courier 10-pt*/
font-family: Arial;
font-size: 14 pt;
See section 10 for information on the use of style sheets.
8 Starting processes
In many places within V-smart you can start a process. In such cases the standard dialog box for scheduling processes will be shown:

Fields on the screen
Start process: Select the method to start the process. You can choose from:
· Online - the process will be started from your workstation and will run until completion. While this is happening you cannot use the current session of V-smart to do anything else.
· Batch - a separate process will be created to perform the action so that you can continue to use your workstation.
· Memory - a separate process will be created and placed in a queue.
Day(s) of the week: Enter the day(s) of the week when this process should run if you are running a process in memory. Monday = 1, Sunday = 7. If this process is to be run every weekday, enter an asterisk "*".
Day(s) of the month: Enter the day(s) of the month when this process should run if you are running a process in memory. This can be a regular date in any month, or a specific date. 1 = first day of the month, 8 = eighth day of the month, 6/3 = 6th March. If this process is to be run every day of the month enter an asterisk "*".
Time: Enter the time when this process should run if you are running a process in memory. Use 24 hour clock format HH:MM. If this process can be run at any time enter an asterisk "*".
Infor recommend that you do not make a time entry unless you need to ensure that processes need to be run in a particular order.
Store in permanent table: Check this box if the process should be included in the table of tasks to be run on a regular basis.
Notes
V-smart assumes that there is an implicit AND relationship between the Day(s) of the week and the Day(s) of the month. If you enter 3 for Wednesday in Day(s) of the week and 15 in Day(s) of the month the process will only be run when the 15th falls on a Wednesday.
Once a process has been activated in the batch or memory mode, its progress can be monitored using AFO 642 ('Monitoring processes'). See the Help for this AFO for more information.
If you run a process as a batch the screen will not refresh to show the new date unless you back out and come back in again.
Licence information
The number of processes that can be activated, as a batch or memory job, is dependent on your V-smart user licence. If the system is unable to create a separate process (because you have insufficient V-smart licences), the message Process was not activated will appear. If you cannot run a process in batch mode, you can still run it online.
9 Material types and item categories
Throughout the Vubis system various terms are used to denote the category to which an item belongs.
Material Type is generally used at the shelfmark level. It is used by the indexing of the title (example partial indexes). If the parameter is based on the Shelfmark and affects the search results at a bibliographic record level then it is a material type.
Individual items are associated with a shelfmark. By default, they assume the ‘item category number' of the material type on the shelfmark.
Item categories are used for circulation rules / loan policies. Items have one item category and multiple items can be associated with one shelfmark.
This means a shelfmark will contain one material type, but the items associated with it can have different item categories and therefor different circulation rules.
E.g. a shelfmark with BO (books) with 4 items under that shelfmark, which all have item category BO as inherited from the shelfmark. It is decided to make one copy non circulating. So go to the item details and change the item category to NonCirc. Which means the loan policies for NonCirc apply even though it still comes under shelfmark BO.
Therefore when looking at the terminology, if the effect of the parameter is on the individual item (loan plans, reservations, loans etc.) then it is an Item category. If the effect of the parameter is at the shelfmark / indexing type level and does not look at the individual items, it is a Material Type
You will see throughout the system, if the parameter is an item category, it is generally depicted as a numeric value followed by (Code). If it is a material type, it will be Description followed by (Code).
Internally CODES are defined. Their position in the list of material types becomes the associated numeric value of item category for this code.
10 Preferences
At the top of your screen you will find a button . With this you can set certain preferences for your own sessions.
After selecting this option a separate browser window will open:
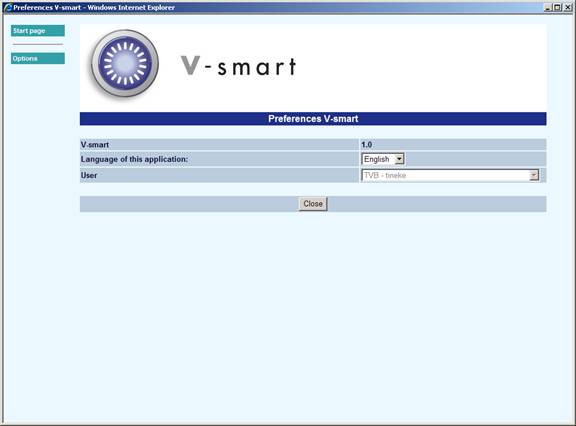
When you click on , the following screen will be displayed:

Fields on the screen
Extra space within table cells (in pixels): this determines the blank space added around texts in tables on screen.
Space between table cells (in pixels): this determines the space added between texts in tables on screen.
Width of the frame (AFO, main screen, menu): use this option to specify the width of the three frames on the screen: AFO shortcuts, information screen and button section as a percentage of the window OR absolute width in pixels.
I.e.: 20%,65%,15% means 20% of the screen is for the AFO menu, 65% of the available window is for the data and 15% is for the OK/Cancel Options buttons.
Or: 400,*,100, meaning 400 for the AFO frame, 100 for the buttons and anything left over for the data frame; (this is an extreme example) results in one big fat AFO selection section and a small button section.
Minimum width of form fields: this controls the width of all forms (input fields minimum length).
Width of the record editor (positions): this determines the approximate maximum number of characters on one line in record editor.
ENTER in record editor = new field: when this option is checked the ENTER key will not just jump to next line but also insert a new (sub)field within the bibliographic record editor.
Display menu entry numbers if number of entires higher than: Enter a number. This option influences the display of menu screens. See section 10.2 for more information.
Preferred language: select your preferred language from the dropdown list. This setting takes precedence over the language defined for the user in AFO 611. As long as no cookies are saved, the AFO 611 setting will still be used.
Date format: this determines the date format as used for display and data entry. The date format setting always prevails over the AFO 651 setting. The latter is a default for batch processes etc.
Style sheet: specify your preferred style sheet. In theory everybody can have their own stylesheet. The stylesheets are stored in the CSS directory of the web application and are not maintained by the individual workstation.
The style sheet determines such aspects as font, style and type.
Please note
Infor supplies the system with a default style sheet. Any changes required will be delivered by Infor via an updated version of this style sheet.
When you want to make your own adaptations, please do so in a copy of the standard stylesheet. It will be the library's responsibility to update their own copies of stylesheets when Infor supplies a new version.
Profile for WebOpac search: here you can specify which profile (as defined in the WebOpac Preferences) must be used for searching the WebOpac from within AFO 111 and/or 113. If no profile is used, the Default profile will be used.
Printing: you can select an option from the dropdown list. They have the following results:
· Do not use print applet – opens a new window with the text to be printed as well as Print and a Close button. The Print button invokes the standard Windows print dialogue box.
· Use applet for slip printing – the printing applet is used for all slip printing (like loan slips in AFO 411 etc), data is sent directly to the chosen printer. All other output will be treated as above.
· Use applet for all printing – the printing applet is used for all printing, data is sent directly to the chosen printer.
See section 10.4 for more information on the print applet.
Port identification: specify your port identification (optional). This can be anything from IP-address to dns-name or any other id.
Please note this must be defined in the server's port management (AFO 612). The site administrator should tell staff what their port-id will be, and then update this in 612 once the user has set his/her cookie. Once the user connects with a defined cookie, its contents will be added automatically to AFO 612.
Port Identification cannot be set when the browser is set up to clear cookies upon exit.
ALL Circulation transactions are done via V-smart record workstation ID as 127.0.0.1 (localHost). If you have a port identification set up in V-smart here, this will be recorded instead.
Code to activate port modification: a code must be entered in this field, if the port identification is changed. The code will be supplied by the site administrator.
Please note
There are 'user' settings and 'cookie' settings.
Normally the cookie setting is applied. You have 2 because that way you can use the same user-id as someone else and still use different settings (in practice something that is especially useful for support and site administrators).
A cookie setting will always have precedence over a user setting. There is, however, another way to force the use of a specific stylesheet: in the URL you can specify a parameter, like: http://myhost/vsmart/StartClient.csp?StyleSheet=mysheet.css.
You can also use this for other settings, like if there are no cookies possible (working from outside firewall through some centralized VPN connection):
http://myhost/vsmart/StartClient.csp?NoCookies=1
Or when you need to start the debugger to identify a particular problem:
http://myhost/vsmart/StartClient.csp?Debug=1
Cookies are domain-bound. URLs to call the V-smart client should contain the dns-name of the server and not the IP in order to be read and processed. Therefore ‘myhost' should NOT contain the IP address of the server.
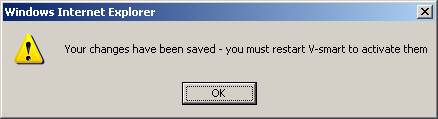
After you have made your changes and clicked , a message will appear:
10.1 Numbered menu display
Display menu entry numbers if number of entires higher than: Enter a number. If a menu screen contains more items than the value defined here, line numbers will appear to the left of each entry. If you set this value to 1, line numbers will always appear.
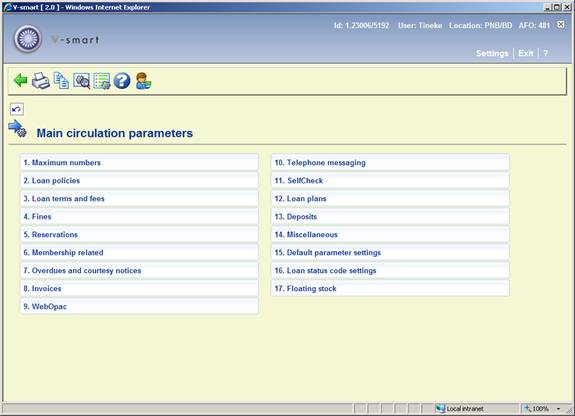
This is an example for AFO 481
10.2 System users
When you are a system user, you will have another option on the Preferences menu, . One of the things this allows you to set, is the welcome text displayed on the main menu.
You will also be able to define settings for other users, by selecting them from the dropdown list. But you can not set their cookies.


Fields on the screen
Number of V-smart daemons (default = 1): Depending upon the number of users and the intensity of use of the application, it may be necessary to have more than 1 daemon. The number of daemons that are used are defined in this field. 1 daemon should be enough for up to 50 users and possibly more. Please contact Infor if you want to change this.
First daemon port (default = 20001): Every browser connection needs an outgoing tcp/ip port on the server. This parameter specifies the first port in the range that can be used for this purpose. Please contact Infor if you want to change this.
Last daemon port (default = 21000): Every browser connection needs an outgoing tcp/ip port on the server. This parameter specifies the last port in the range that can be used for this purpose. Please contact Infor if you want to change this.
Note
Port numbers that end with 0 are not used, so the number of available port is 90% of the difference between the last and the first port.
Use local file for port ID; directory of local file: When a path to a local file is entered here ( e.g. "C:\MyConfigInfo "), the system will look for the file "PortId.txt" in this directory on the local workstation – this file contains only 1 line with the desired port ID.
Use application login as port identification: When this option is checked, the first Vubis login will be used automatically as port identification. You must login once to activate this option. Then this value is saved as a cookie on the user's workstation.
Since this value is stored as a cookie on the workstation, it is read / used with the initial connection. Changing user ID within the application or on initial login will not overrule the value stored in the cookie (thus changing the initial port identification on the fly)
Use IP address as port identification: This can be used by sites that use fixed IP addresses. If marked, this option tells the application to use the IP address as port-id.
Use DNS name as port identification: When this option is checked, the DNS name of the workstation will be used automatically as port identification.
This option is ONLY available when "reverse DNS lookup" is activated on the webserver.
Code for modification of port identification: This is a code that the user must enter if (s)he wants to change his/her port identification. That way the site administrator can prevent that people make unauthorized changes to their port-id. If left empty no code needs to be entered by the user (normally this will be the case during the initial user setup of a system). Once a code has been assigned, users that need to change or re-enter their port identification should first obtain the code from the site administrator.
Text on start screen: The text (with HTML code) that will be shown on the initial V-smart screen (after having logged in), for each user language.
Notes
If you have saved a specific port id name in your Options page, this overrides all other settings. It is saved in a cookie on your PC.
Otherwise, it looks for the System wide setup in the Administration setting page and looks to see which box is ticked (IP, DNS name or Login).The order in which the system checks for port ID is as follows:
· 1) Port-id from cookie
· 2) IP
· 3) DNS
· 4) Local file
· 5) Login id
It will check the *activated* options in the above order and stop checking once a port-id is found.
You will need to define or modify a port record in AFO 612 only: IF you create a new port ID OR use method Use local file for port ID; directory of local file or Use application login as port identification.
Port identification / association is done when the workstation browser first connects to the V-smart application and the port Identification is not changed on the fly which is why any changes to the port ID record, the port record in AFO 612 or the method used will not take effect until the current V-smart session is closed and restarted.
For the option Use application login as port identification it is required that you login and logout to set the port ID the first time you login to a newly installed V-smart application. Because the port record in AFO 612 is not created until after you log out.
It is possible to store the port-id in a local file on the PC. The system will assume the PortId.txt file is physically located on the workstation in a local directory called MyConfigInfo on the C drive. The contents of the PortId.txt file is just a string which identifies the port record you will be using in AFO 612. There should be nothing else in this txt file, for example:

Note Regarding File Path Specifications on Windows Systems
When you are specifying a java.io.FilePermission, the "target_name" is a file path. On Windows systems, whenever you directly specify a file path in a string (but not in a codeBase URL), you need to include two backslashes for each actual single backslash in the path, as in
grant {
permission java.io.FilePermission "C:\\MyConfigInfo ", "read";
};
10.3 Printer applet
Printing: if for this option you have selected "Use applet for slip printing" or "Use applet for all printing", output from the application can be sent to a local or network printer (any printer your workstation has access to).
Once this is activated, a message will appear the next time you log in:

Once you have acknowledged this printing is enabled. You will see this by the appearance of a printer button displayed in the top frame of the V-smart screen:

When you click on this button, the following dialog box will appear:
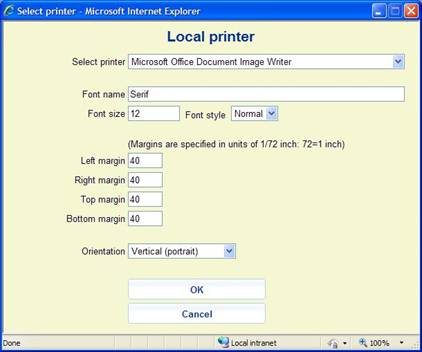
Fields on the screen
Select printer: The dropdown list will contain all printers (local and/or network) valid for your workstation.
Font name: You can type in any valid font type (such as Arial, Times New Roman, Courier).
Font size: Key in the required font size.
Font style: Select a style (Normal, Bold or Italic) from the dropdown list.
Margins: Margins are specified in units of 1/72 inch, i.e. 72=1 inch. Only numeric values are accepted, 0 means 'no margin'.
Orientation: Settings to indicate paper orientation (horizontal - landscape or vertical - portrait).
10.4 Printing circulation slips automatically
To automatically print circulation slips for a workstation printer, the cookie on the browser workstation must be set to use the Printer applet.
On the workstation from which you print:
· 1) Determine the Port setting you are using
- First determine what port the workstation is using via the “Who Am I” (WIE) icon. See above for the possible options to set a port ID.
Note
The Port ID can be stored as a cookie. If you are using Login ID as the method of port Identification, you will have to login twice; initially for a change of User ID since the port connection is done before the login ID is entered.
· 2) Define the port record to use a workstation printer
- In AFO 612 for this port ID record, set the field “Printer Port” to be “0;”
- In AFO 612 for this port ID record, set the field “Ticket Printer” to be ‘T”
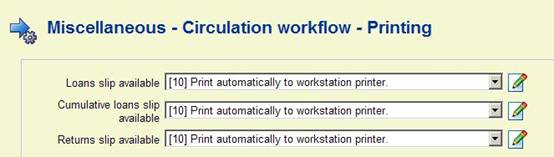
Set Loans slip, Returns slip, Cash receipt, Cumulative loans slip, etc. to “Print automatically to workstation printer” in AFO 481 - Miscellaneous - Circulation Workflow - Printing - Loan slip & receipt printer control, i.e.:
As soon as one exits from AFO 411 (or equivalent) for the first time, the Security warning popup screen displays:

Click on the check box to allow the applet to access the printer and click ..
10.5 Browser settings for printed output
Output sent (printer) to the browser will use the browser settings for Printed output. When the browser is enabled to allow downloads, printed output is sent back to the browser with the Print option visible.

Clicking on the print button, will allow the browser to print the data. By default, all browsers will include a margin, header and footer information such as the URL, page numbers, date/time etc. as well as orientation set to portrait. For output such as notices generated, the default printer settings for the browser should be adjusted to remove the margins as well as the header and footer information.
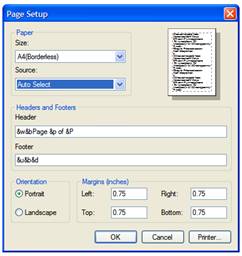
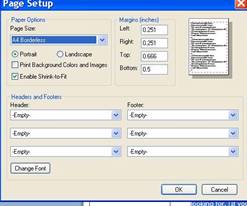
Internet Explorer 7 Internet Explorer 8 Settings
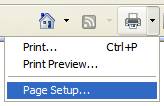
Click on the down arrow for the printer icon on the IE7 / IE8 toolbar and select "Page Setup”
Select your Paper Size: that is Letter Borderless or A4(Borderless) from the drop down list. Set margins up to 0 (there will be other defaults that come in from the browser but just accept them.) Clear the Header and footer to suppress the page / url / date / time etc from automatically being inserted into the browser output. Select Orientation.
Example IE 7 (with large margins and header/footer information)
IE 8 With minimal margins and no header/footer on output. Note that default font can be set also.
Firefox Printer settings
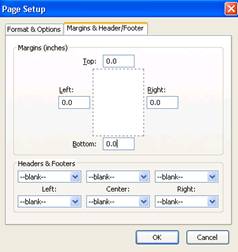
Choose "File" -> "Page setup..". Click on the second tab called "Margins & Header / Footer". Adjust the margin numbers to 0. Adjust headers and footers.

11 Browser settings
Below are some recommendations for settings in Internet Explorer.
· Access TOOLS / Internet Options / Security tab. Select Trusted Sites. Click on the Custom Level button:
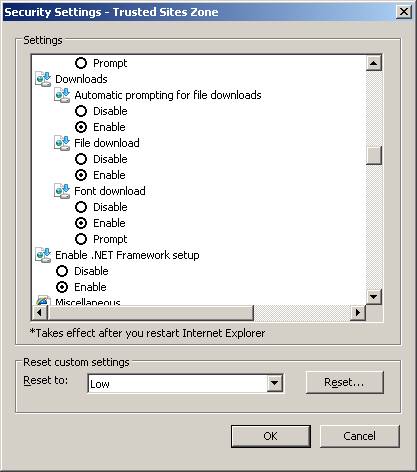
This setting will allow output to be sent back to the browser.
If this setting is not enabled for your ‘internet security ZONE' then IE 7 will do the following :
Output is generated and sent back to the browser (screen / word document etc). The first time per session this is asked for there is a message at the top of the IE browser window stating that Internet Explorer has blocked output (requesting permission to download). This in turn Logs off the session (leaving any records locked and loosing the output).
· Also ensure Cookies are accepted and retained.
· Check under Tools – Internet options – Programs to see the default programs associated with application extensions.
E.g. you may have set Outlook as the default email program. You can send emails to borrowers by clicking on the email link in AFO 431. If you so this on a workstation that does not have Outlook installed (for instance a generic circulation desk PC), it will not work of course.
11.1 Enabling sounds
V-smart supports audible alerts. Source of the wav file is located in the Sound Directory as beep.wav). This is an activeX control.
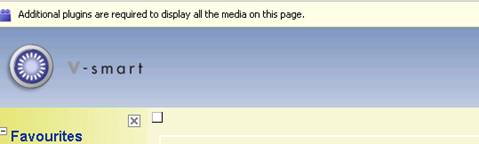
When initially connecting to the V-smart application, browsers may require the activeX control to be enabled for the workstation. They may also require plug-ins to be downloaded.
Firefox – sound Plug-in
Firefox users will have to install the Apple QuickTime plug-in.
When initially starting the V-smart session, users will see a message in a title bar as well as a checkbox
Click on the square ![]() to get the required plug-in or click on the button
to get the required plug-in or click on the button
 from the toolbar
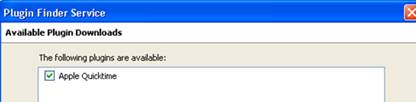
Select Apple QuickTime then click on the Next button

Click on Manual installation and follow the instructions from the Apple website
This will require download of installation package and then the execution of the installation package on your workstation
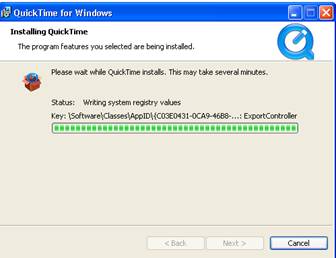

Restart the Browser.
12 Browser issues
Below is a list of known browser issues:
· Do NOT use the ESC key to go back to a previous screen. This may cause the browser to freeze.
· If a popup window appears, one can close this window via X. Sometimes the session is then frozen. Therefor Infor recommends you always use the OK or Cancel buttons on these popups.
· Drag-and-drop in record editor and treeview must be done with the right button in Firefox
· Fields in the record editor have (too) much space between them in Firefox – this is a browser problem
·
IE6 mostly does not have the cursor in the first field (Login) of the initial login screen.
IE 7 intermittently has the same problem. Firefox does not have this problem.
· IE 6 and IE 7 - Insert 2 special characters (line break/ non-filing indicator) on the same field not possible in different locations. OK with Firefox Workaround with I.E is to move the cursor and click in a different field, then return back to your field for further editing.
· back slashes (i.e. c:\path\filenname) are stripped if entered as part of the URL information in the record editor.
· If for V-smart the IIS services are defined to use lower case only, then:
- The URL to start the StartClient.csp page contains the first character of the directory in uppercase; (ie In your URL you have put "Vsmart" with upper case "v" instead of "vsmart".). This can cause some really unexplanable things to happen, like Java script errors.
- Using IE6. The ICONS on the toolbar are bigger than the space alotted for the toolbar therefore the icons appear incomplete. When the URL directory is changed to use the lowercase version, these issues just go away.
· When migrating from IE7 to IE8:
- if you have a shortcut defined to access V-smart with IE7 this may lead to problems when migrating to IE8
- Therefore Infor recommends you delete your IE7 shortcut and create a new one for IE8
·
In some AFOs (like 132) it is possible to define the name of a file to which the system must save information. It is recommended you only use known extensions (like .txt) for such definitions.
After the process, the system displays a separate dialog window asking if you want to Open the file, Save it or Cancel.
- If you have an unknown file extension and select to Open the file, Internet Explorer will do so in the same V-smart window. After which you will have lost your Vsmart session. Therefore, if you do want to use unknown file extensions (e.g. exportreport.bad) we recommend you always use the Save option.
- If you have an unknown file extension and select to Open the file, FireFox will prompt you to select an application to open the file with. So there the problem with losing the V-smart session will not occur.
·
For Vsmart customers using the FireFox browser:
Please be advised that the Browser can appear to ‘freeze' without a disconnect message and force the closure of the Vsmart client session while in the AFO111 record editor ‘randomly'
In FireFox settings, even though it is configured to allow the pop ups from the VSmart server, sometimes FireFox blocked some windows without an obvious reason.
- Sample Symptom(s)
· While doing the authority lookup, suddenly the session is no longer responsive
· Suddenly a blocked popup message occurs.
· Suddenly clicking on any of the options within the data frame no longer respond
- Cause:
· FireFox has an internal setting to force a block of ‘popup' windows when x popup messages from the same website (even though the website is allowed to display popup message). By default this internal setting has a value of 20.
- Resolution:
· Only known resolution at this time is to change the configuration settings for the FireFox browser on the workstation experiencing troubles. In the address bar of the FireFx browser, type about:config and then go to line:
·
dom.popup_maximum key
· Its default value is 20. Change to a higher value (i.e such as 100). Restart the FireFox browser.
· This is not required for all workstations. Just any which may be encountering the blocked popup messages.
12.1 Supported browsers
The following browsers are supported:
· Internet Explorer 6.0, 7.0 and 8.0
· Mozilla Firefox 2.0, 3.0 and 3.5